Hacking the Thumbswitch
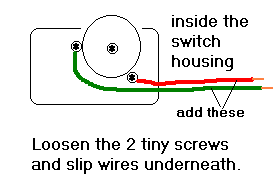
Open up the little white case. It might be glued together, but just pry it open with a tiny screwdriver. It is very easy to slip a couple wires under the 2 screws (see diagram below for detail) that hold the little wheel switch assembly to the housing. When these wires are joined, the ride starts up just as if the thumb wheel is clicked "on," although the thumb wheel will be in its "off" position. When the wires are disconnected the ride goes into the shutdown. If the wires are quickly joined during shutdown, the ride will continue into its shutdown, but the lampposts and LEDs around the sign will stay on after the motion has stopped. There is no sound track playing when using this method. If the sound is desired, the thumb switch assembly can be altered by disabling the little spring and insulating the electrical contacts so the wheel will adjust the volume, but only the additional wiring will turn the ride on and off. Replace housing cover when finished.
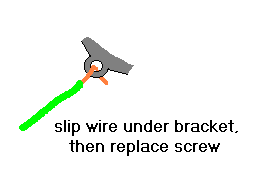 Actually, just slip the fine wire under the hole in the metal bracket, then replace the tiny screw. The thumbwheel needs to be removed to get full access to the screws. It is held on by the one screw.
 Notice that this push button is a normally closed type, unlike many push buttons that are normally open types like a door bell push button. With this method, the thumbswitch is in its "off" position, and the AC adaptor supplies power to the ride all the time. After shutdown, pushing the button again will restart the ride. This method works well on a train layout. Push to start-up, push to shut-down.
[back to the JFS limit switch re-wiring page]
[back to the JFS repair page]
[back to the Junior Flight School page]
[back to the main page]