Reed Switch Tutorial


      One advantage of a 3 rail track system is that an insulated outside rail can be used to activate a switch or device without any complicated wiring or circuits, just by having the metal wheels of a car or loco ground the insulated rail and the circuit connected to it. However, there may be a situation where you’ll want to activate a crossing signal (or other device) without altering the track to create long sections of insulated rail. And this circuit is also very useful for American Flyer operators who have never had the advantage of employing an insulated rail circuit. Well, the inexpensive magnetic reed switch, a staple in alarm systems, comes to the rescue. A reed switch is just 2 pieces of metal in a glass tube. To keep this simple, we will deal only with a normally open reed switch. The concept is simple: A magnet is glued under a car or loco, and when the magnet passes over the reed switch placed between the rails, the reed switch will close a circuit as the magnet causes the two pieces of metal within the glass tub to touch. A standard relay will then allow for the control of another device because a relay can have several contacts, or poles. (A relay is essentially a electronic switch that controls other switches.) For our example, a DPDT relay means the there are two poles (double pole or DP) that can be thrown two ways (double throw or DT), either open or closed.

      Diagram # 1 will tell the story better than words. The reed switch will cause the small light bulb to light for as long as the magnet is near the reed switch. But as soon as the magnet moves on, the switch will be open and light will turn off.

      Diagram # 2 shows how two reed switches, which can be placed any distance from one another, will cause a crossing signal to be turned on, and then off, as the car with the magnet passes above. The passing magnet will cause the first reed to energize the first relay and it will remain energized until the magnet reaches the second reed, then activating the second relay which will cause the first relay to become un-energized. The first relay is wired to control a crossing signal, see diagram 3. The first relay is wired to “latch” or stay energized. The simple latching effect is easy to achieve and is a most useful way to use a readily available, inexpensive standard relay for toy train purposes. The “latching” keeps the relay from ‘bouncing’ or dropping out. (The wiring that causes the latching, the highlighted area in diagram 4, requires the use of one of the unused poles of the relay. The second relay is used to ‘unlatch’ the first.) Another advantage of this type of circuit (over an insulated rail circuit) is that the reed and relay controlled circuit is a separate electrical circuit that doesn’t depend on the track to ground any part of the circuit. (And dirty wheels, which can cause conductivity problems with insulated rail circuits, won’t pose a problem here.)

      Diagram # 3 shows the wiring detail of a layout accessory to the first relay. The crossing signal will be turned “on” whenever the first relay is energized and will remain “on” until the second relay cuts power to the first. Of course, any device, sounds, animation, lighting effect, etc., can be controlled by the passing of a train.

      The reed switch, placed between the rails, can be lightly covered with ballast and still allow for the magnetic pull to activate the reed, but the clear glass that houses the switch makes it almost invisible against any surface. Be careful to keep the reeds bare leads and wiring from touching the rails. And the reed can be painted to match ballast or terrain. When gluing the magnet to the underside of a piece of rollingstock or truck assembly, be sure to check the clearances over track switches and special track sections. Magnets come in many shapes and sizes, so finding one for your particular project should be a breeze. Best to buy several since they are inexpensive and have varying amounts of power.

The highlighted area in the diagram above shows the wiring that causes the relay to "latch."


      Inexpensive fixed voltage wall transformers can be used to power the relays, freeing your transformers and simplifying wiring. Although the relays used here are DPDT (double pole, double throw), 4PDT relays that have a total of 4 sets contacts allow you control multiple devices from one relay. Once you master the reed switch circuit, you’ll find many applications for this dependable, almost invisible method of automation.
      And the magnet and reed switch doesn’t have to be located only between the rails, but can be placed in any arrangement where a magnet, perhaps inside a box car, can pass a reed attached to a pole (or other trackside object), as long as the pull of the magnet can activate the reed (see diagram 5). It is surprising how the power of a small magnet can attract the tiny, sensitive metal contacts of a reed switch at a distance of about an inch or more, even through a layer of plastic or thin wood. And yes, even in this age of computers and fancy electronics, there is still a place for this most useful, easy circuit.
A diode placed across the relay coil will protect the delicate reed switch contacts. Remember that this diode is placed in the opposite direction of the normal current flow.


      The site owner is not and cannot be held liable for fire, electrical shock, property damage, bodily injury, loss of life, or accident of any kind caused by electrical circuits or any ideas, projects, techniques, or information contained on this site. The visitor assumes all risk and responsibility for any loss, injury, accident or damage arising from the use of information, ideas, techniques, projects, concepts, components, products, and circuits on this site.

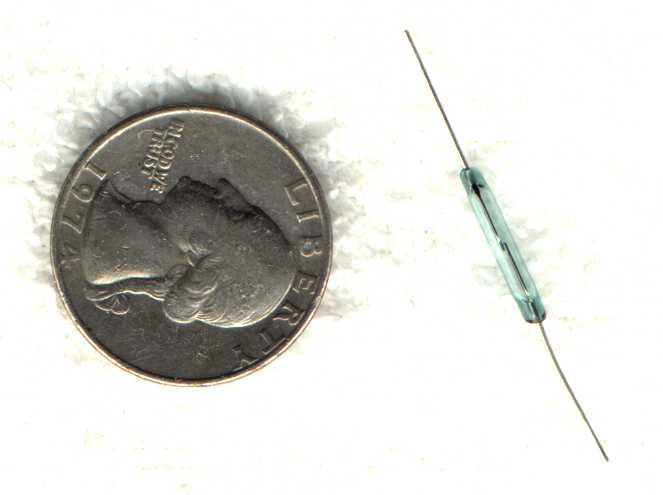
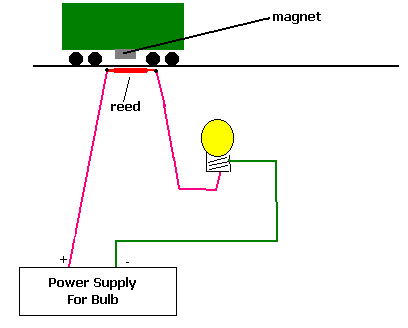
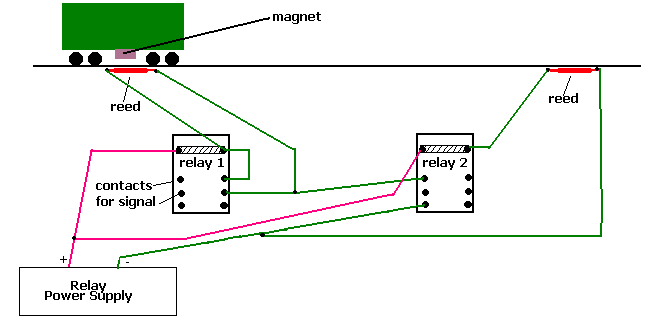
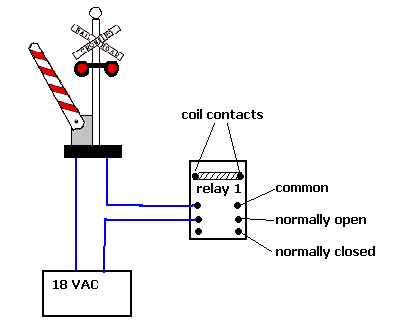
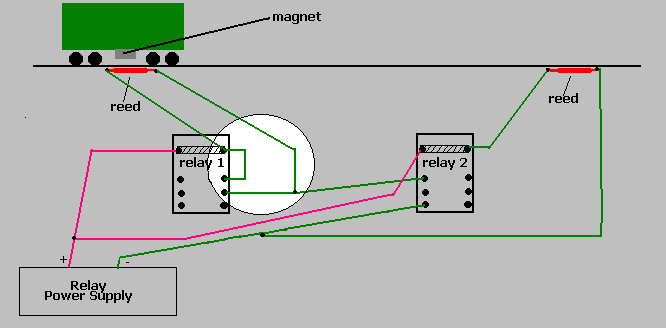
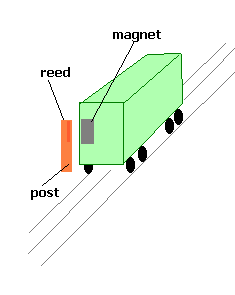
      Please refer to hobby reference materials for correct and safe use information regarding these and all electronic circuits.  These diagrams are intended to explain how things were accomplished in theory, but it is the responsibility of the individual to locate precise information regarding electrical circuits, materials, ratings of components, etc.  Do not attempt these hobby projects, or any electrical project, if you don't have the necessary skills and experience.

[back to main page]