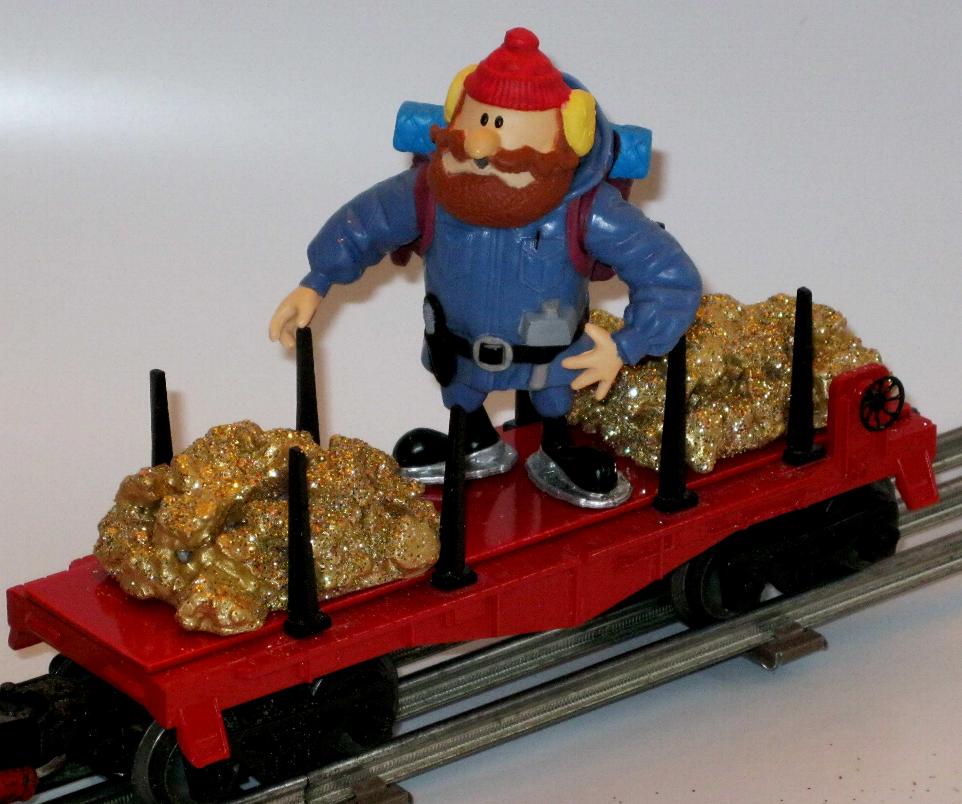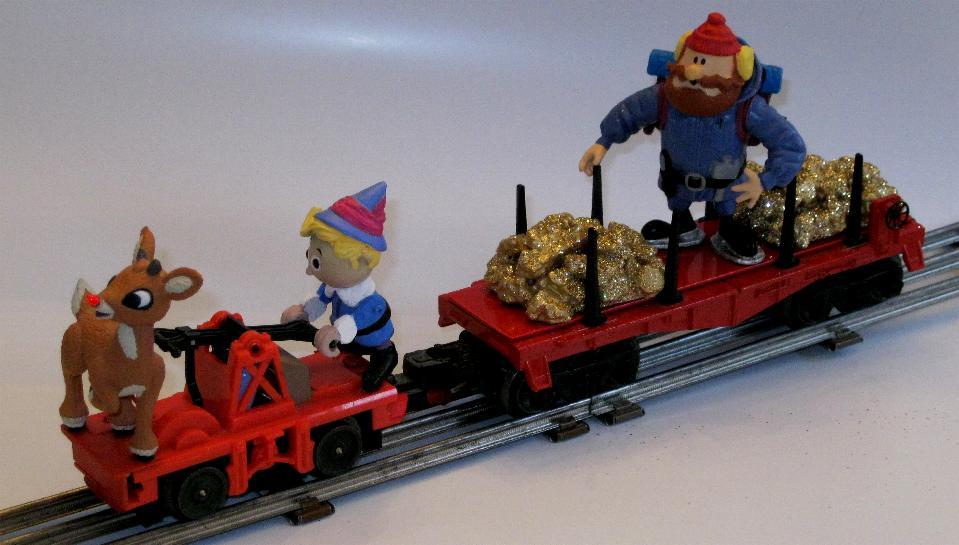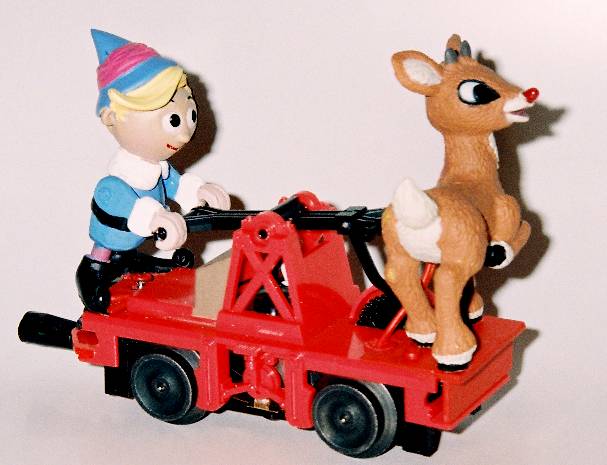
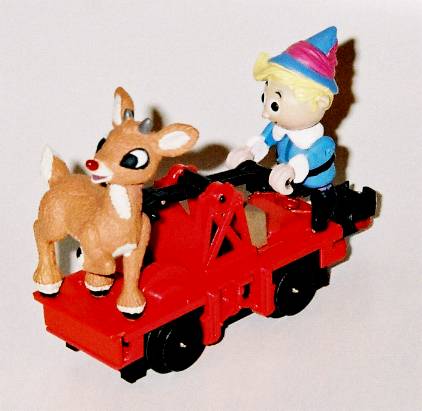

The handcars are special because the figure(s) appear to actually operate the car by pumping the handle. The repetitive motion has a reason to be repetitive, unlike most animation that should be random or intermittent, so this motion is prototypical for propelling a handcar. Unfortunately no manufacturer makes a Rudolph and Hermey handcar in any gauge. In the context of the story from the original special, Hermey and Rudolph, the 2 misfits, went off on their own, so there is a reason for them to be together on something that allows them to travel. For many fans of the special, young Rudolph, not adult Rudolph, is how he is remembered. The ability to actually light up his nose is so very important to his nature and it was the object of the conflict in both the famous song by Johnny Marks and the storyline of the first (and best) special. And the Rudolph figures in the special had actual light bulbs for noses. (And anytime I can put a light in something, I do.) Aside from what might seem like a difficult task, the handcar is easy to tap into for the connecting the light. Also the lighted nose overcomes the lack of animation on Rudolph's part on the handcar. Although better sculpts of these figures now exist, Hermey's height is just about perfect for a handcar figure that doesn't have articulated hips, and this Rudolph has a three-legged stance, with one leg raised, that looks good on the limited space at the front of the handcar.
Working with Hermey
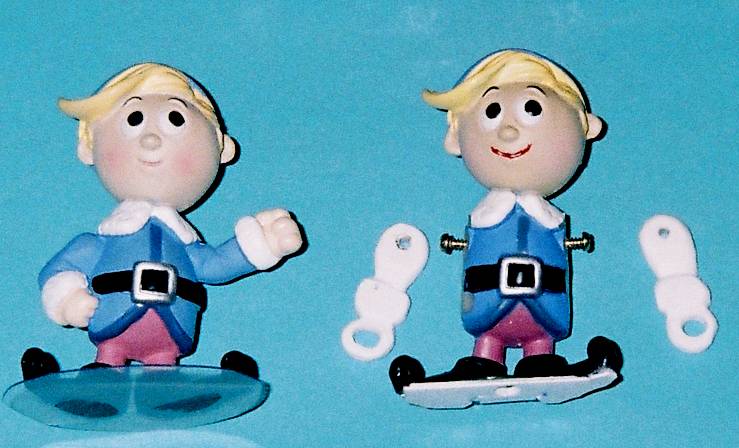
These Memory Lane Rudolph figures are made from PVC (I gather) with some being a harder material than others. Rudolph is more rubbery where Hermey is rather hard, I imagine because his legs are slender. Hermey's arms where removed by cutting them off with a hobby knife (set aside cut off pieces), then his shoulders and sides at his waist were whittled down to cuts that would be almost parallel to rails as he would stand on the handcar, however the cuts angle ever so slightly inward so his hands stay on the handles. Hermey rocks forward on his toes since he isn't articulated at the hips. The arms are made from 2 pieces of .060" thick common sheet styrene laminated together with additional pieces to suggest fingers, carved and smoothed with an emery board. More dimension is possible for bulking up the arms, hands, sleeves, and cuff by applying some model putty (coated with CA glue when dry, for strength), but when in motion these simple arms look great. When carving Hermey, wrap his head and shoes in a few layers of masking tape to protect them from accidental knife slips. Those with a little wood carving experience will have little difficulty in carving away the unwanted PVC. Just shave away unwanted material a little at a time. A new blade in the hobby knife is a great help, just be sure to protect your eyes with safety glasses or goggles.
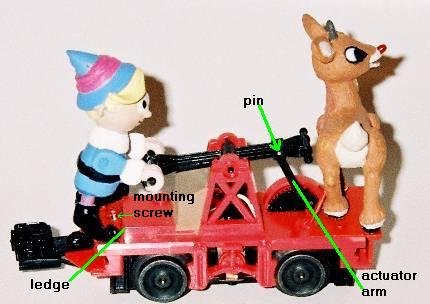
Tiny machine screws from an old computer keyboard are just perfect for attaching the new arms (which move freely) to the figure, and the harder PVC holds the screws firmly. Test the size of the pilot holes for these screws in the scrap pieces from the arms that were cut off. The pilot holes need to be perpendicular to the shoulder cuts. If you make a mistake and the pilot holes are too loose to hold the tiny screws, use a larger screw because these pilot holes need to be rather tight. (The screw heads are later painted to match his coat.) The styrene piece glued under Hermey's feet is .020" thick, then beefed-up with another piece between his feet applied from the top so as not to add height to figure. His left toe extends over the base piece. (Getting his feet as close as possible to ledge aids in achieving better action. Cutting away part of the ledge may be helpful.) The mounting hole in the base (for the mounting screw) only needs to line up with the pilot hole in the handcar's body and is not on-center. The mounting screw is not driven in completely and it allows for Hermey to rock forward on his toes. Hermey's new arms are painted with acrylic paint, as well as any touching-up on his body. His mouth was painted to a nicer, broader smile. The mounting screw has its threads filed off near the head so as not to restrict the rocking of the base.
Rudolph's New Nose
Rudolph is an easier job, once you muster the courage. Just cut off his original nose completely, then drill down toward the back of his neck. This angle is important so the bulb is at the correct angle. If the wire leads from the bulb are fine enough, they can just be run along the back of the body and painted. Because mine had a thick insulation, I carved a channel into the back of the figure, then decided to spackle over the wires with household latex caulk when paint alone wasn't enough to hide the wires. (When the caulk was still wet, I stippled it lightly with a toothpick to match the surrounding texture.) Regular acrylic craft paint was used to cover the caulk once dry. It is possible to completely conceal the wire along the figure's back, but since the light would probably need to be replaced at some point, it is not run along the leg to exit at the hoof. The light was a clear bulb, then painted a translucent red with mix of acrylic gloss varnish and red acrylic paint (first clean the glass bulb with rubbing alcohol).

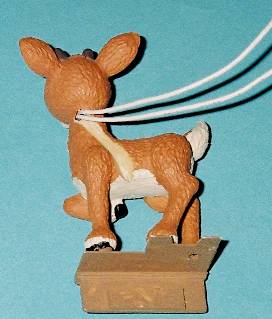
It would be easier to cut off the head, drill in partially from the nose with a slender bit matching the bulb's diameter, then up from the neck cut with a larger diameter bit. A small cavity would then be made in the head. With the body, drill down (large bit) from the open neck through the body to exit the abdomen. Fishing the wiring wouldn't be difficult and there would be no painting necessary, and the light would be easier to replace because of the large cavity created. (The head would be glued back on and there would be no loss of material if the head is cut off with a knife as opposed to being sawn.) An LED might be a good choice since it should last longer than a bulb, but would require rectified current and a resistor.
About Paint and the Light
The light is All Electronics' CAT# LP-6, 14V @ 45 ma., 3 mm clear. The color of craft paint that closely matched Rudolph's fur was called Sedona Clay #2301 by Accent - Country Colors with a dot of white to slightly lighten it. Hermey's coat is Dark Blue, #72754 by My Studio, with a drop of white. Hermey's flesh color is 2 parts Spring Pink #2504 by Accent - Essential Colors and 1 part Khaki #21600 by Color Traditions, with a dot of white. Rudolph's fur was the most difficult to match (by trying to mix brown and orange), but fortunately I had a bottle over 15 years old that was still good and an almost perfect match. I good color match makes all the difference! Most acrylics dry to a slightly darker color, so often you will need to lighten them with a little white after you get a good match when wet. Take the figure to the craft store and compare it with the color in the little bottle of paint by checking how it appears from the underside (bottom) of the bottle. Not a perfect technique but it helps if are not used to mixing your own colors. When purchased on sale, buy a range of colors so you can test them under different lighting conditions at home. Often it is just trial and error until you find a good match, or you can mix your own colors.
Glue and Diode
I used CA (instant super or crazy glue) to glue the figures to styrene, and styrene liquid glue to join styrene to styrene, as in Rudolph's base pieces that extend the handcar at the front by about 1/8". I used a small diode in series with the bulb (1N4003) to reduce the brightness by about half when run on AC, to preserve bulb life, and to prevent the color-coating from burning off. The light is wired to the wheel and center rail wiper pick-ups.
Simple Concept and Adjustments
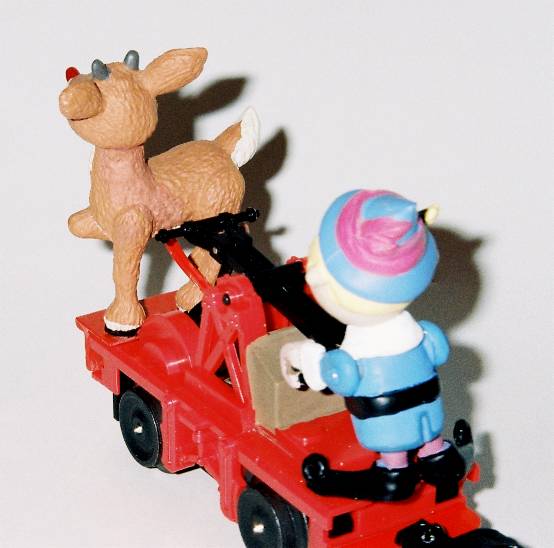
The photos and diagrams are practically self-explanatory. After Hermey's original arms are removed, he is prepared with the base that allows him to rock on his toes. Because the variation possible in the placement of arm screws and mounting positions at the base, arm lengths may need to be adjusted accordingly, but they are at their length limits in this example. Also the actuating piece (that connects to the gear at the front of the handcar) may vary in length depending on the handcar, so it helps to shorten its length, by deepening the 2 bends, so the handle doesn't descend too closely to Hermey's feet. This handcar is the Lionel Porky Pig and Petunia handcar, without those figures.
Ideas for Use
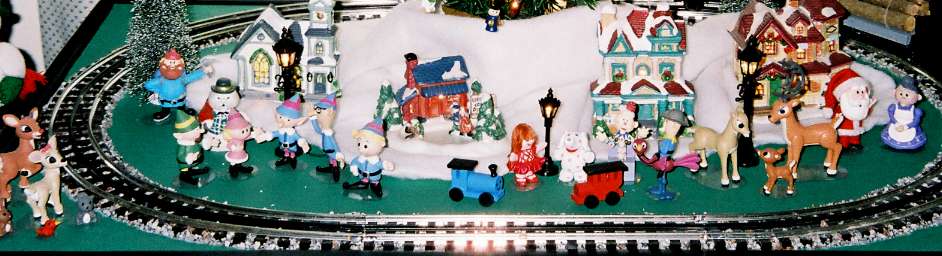
The group of figures that accompanied these figures are perfect for setting up a scene around an oval of track. The unaltered handcars don't run through some crossovers and switches without stalling, so some sort of trailing car that picks up current (or flywheel circuit) is helpful and allows for all sorts of track configurations. The handcars also run well on GarGraves bent to curves as tight as 22-24" in diameter (measured from the outside rail), so interesting small-space track plans are possible. (However bending GarGraves to such a tight diameter is not easy for a beginner.) Like all homemade projects, some tinkering is always necessary, but remember that often just a slight adjustment makes all the difference in something either working or failing. I also tapped into the electrical pick-up of the handcar with a standard Christmas tree mini-light socket for future expansion of the handcar's electrical pick-up in a trailing car, so it can navigate all sorts of turnouts, crossovers, less than perfect track, and handle moderately dirty rails and wheels. Mini connectors are available, but a socket from a set of mini-lights, especially those with finer gauge wire (from indoor sets of 10-35 bulbs), is an inexpensive alternative. The light bulb base piece is then used as the male connector, with the new lead's bare wires run into the 2 tiny holes, just like the original bulb leads.

Check my other pages for adding a coupler and a trailing car to a handcar for more information about improving performance.
Some Ideas for Added Interest
A Lionel air whistle controller circuit could be used (in the trailing car) to light Rudolph's nose only when the whistle button is depressed. The circuit board would be wired as usual but with the light wired in place of a whistle's fan motor. Not only would the bulb life be greatly extended, it would be great fun to have this type of control, so simply, in conventional operation.
Figures May Be Hard to Find
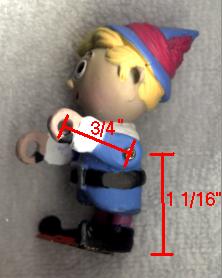
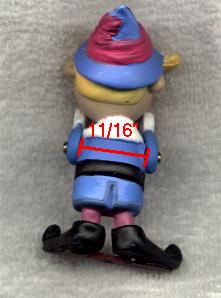
The 2 figures date back to about 2003-2004, judging from a quick check online, and they are no longer available. The newer versions might not be as easy to adapt since the newer figure of Hermey is a little taller than the one I used and might require some articulation at the hips, which is more difficult to do. Searching eBay might reveal some used figures, identical to ones I used, perhaps as large lot. The older Hermey sculpt (the one I used) has his right arm at his side, and the other extended. He also has no visible neck / high collar. The Rudolph has the 3 legged stance with one leg raised, his front right. Enlist the help of family and friends to help find these figures online. It might be easier to find them off-season rather than at Christmas. Check the latest offerings to see if new sculpts would work as well.
Using Other Characters/Figures
This method of articulating an existing character figure can be adapted to many action-type figures provided they are approximately the same height from the base to the shoulder as this Hermey figure. However, with a little more effort, a figure can be articulated at the hips which would enable even a taller figure to work on the handcar. For those with a little more experience, making an entire new body, with the exception of the head, would allow for precise control over the critical dimensions. Typically the head is the most difficult to make, so using a ready-made head from an existing figure greatly simplifies the process. Those who have a little experience carving and sculpting (or making whirly-gigs) could have good results with their efforts. Online auctions offer hobbyists a way to find figures that are out-of-production, but use your good judgment when buying anything online so you don't get cheated.
Last Thoughts
One important thing to remember about animation on a moving object, as in this project, is that perfection is not usually noticed when the handcar is in motion. I was very pleased with the plain hands on Hermey, but when wanting him to look good for a photo, I decided to beef-up his hands for a more 3 dimensional look. As far as the enjoyment watching the handcar operate is concerned, there would be little difference for most people with how his hands appear. Color matching is really key to getting a good-looking result, but an exact match isn't necessary if you can repaint an entire area, as opposed to just touching-up. The painting really brings the whole project together. No matter how many of these projects I do, I am always amazed at the transformation painting produces. If you don't mar Hermey's face while working on him, there is only very simple painting to do, with the exception of broadening his smile. I have found that working with magnification and good natural light aids in getting a good result with hand painting. (When working with acrylic paints, simply wipe off any mistakes with a wet cotton swab, and start again.) If it looks good at arm's length, then it is a success!
Marketing Ideas
It is my belief that handcars are the perfect product to introduce new people to the O27 hobby, especially those who do not have trains or feel comfortable setting up track. With the growth of the Christmas village with the Department 56, Lemax, and other manufacturers' buildings and animated accessories, the market is ready for an offering like this offered in retail stores, certain discount stores, and craft chains . The popularity of any character can be used to bring attention to a line of trains, by way of a handcar. Once a customer buys a handcar, perhaps in a set with a small loop of track, AC transformer, and an instructional DVD, the demand for other products, and eventually a more elaborate set-up with robust trains, will be a strong possibility. Women are especially captivated by the handcars but feel intimidated by the electrical side of the hobby. However unlike men, the ladies will read instructions or follow an instructional DVD. And an instructional DVD is a great opportunity to showcase a complete product line and how-to information on benchwork and train/track maintenance. (Many women are intimidated by a bare wire, but will follow wiring instructions for cords with connectors.) The following points need to be emphasized:
1. Confidence in the brand and product by Lionel
2. Simple set-up of a handcar scene in a small space but expandable (2 examples,
perhaps on a coffee table in a nice room and a larger 4 by 8 ft. layout)
3. An under-the-tree option, especially for a Christmas themed item like this handcar
(sold as a small set with track/transformer)
4. To break out of the toy category, use young-looking baby-boomers and adults, not kids or gray seniors, in the art/packaging and advertising
Obviously, launching a new idea like this would require that the economy be strong and that testing be done with potential women customers (focus groups).
Back in about 1990 when the Lionel Snoopy and Woodstock handcar was offered broadly in the discount chain "Murphy's," the packaging, advertising, and minor flaws in its appearance didn't do justice to the product or the brand name. I remember seeing a rather bad line-drawing of the S&W handcar (in black and white) in a newspaper ad, and I even dismissed that handcar at that point, a long-time Charlie Brown and Snoopy fan. As I have mentioned before on my site and the forums, many of these products need to be seen in operation to be appreciated fully. In this case, seeing the illuminated nose makes a huge difference. One key piece of advertising in a women's magazine, or product appearance on morning television, could be dramatic and create tremendous demand! It would be well worth the price of reasonable licensing fees to have a particular character catch the attention of potential customers. And if some sort of partnership with a company that mass produces accompanying pieces could be arranged, then perhaps an equitable licensing fee might be a good possibility. Also, having an online video clip of the product is a great way to cut certain advertising costs and showcase a product. What's my interest in this? Just ask!
Update: December 17, 2011